How to propagate grapes at home: 4 methods for every gardener

We explain how to propagate grapevines. We offer a detailed description of various methods of grape propagation.
Cultivating a vineyard involves regularly replacing old or diseased plants, expanding the plantation, and performing other similar tasks. All this requires the purchase of new seedlings. But instead of buying them, you can obtain planting material yourself. To do this correctly, let’s take a look at all the intricacies of how to propagate grapes.
Everything you need to know about propagating grapevines yourself
What are the methods of grape propagation?
Under natural conditions, the plant can propagate vegetatively and by seeds. These same methods are used in grape cultivation. However, it is essential to understand the distinction between seed and vegetative propagation methods. The difference is that a plant grown from seed may not retain the characteristics of the parent organism. This is because the plant is heterozygous, meaning it produces genetically diverse offspring. In addition, vines grown from seeds have a long “infancy” period, so they begin to bear fruit two or three years later.
Vegetative methods involve obtaining planting material that is entirely identical to the mother plant. For this reason, all varietal characteristics are inherited in full. Vegetative propagation uses the culture’s ability to regenerate. That is, the ability to develop a full-fledged vine from a separate part: a cutting, a layer, etc. Bushes grown using this method start bearing fruit earlier, grow faster, and develop actively. In practice, vines are very rarely propagated by seed. This is only done for species that are consistently and poorly rooted. Winegrowers prefer to propagate the crop by layering, cuttings, and grafting.
How to propagate grapes at home
Seeds
Although this method is not widely used, it is also employed to obtain viable seedlings. Seeds are obtained from fully ripe, healthy berries. They are dried and stored until sowing. Before sowing, the seeds require treatment. They should be stratified for one to two months and soaked before sowing. You can sow directly in the place where you plan to grow the crop, or in seedbeds.
In some cases, seedlings are grown in the same way as vegetable seedlings—in humus pots, greenhouses, or hotbeds. This accelerates the onset of fruiting in the grown vines. Regardless of the growing method, sowing is carried out in the same way. The seeds are placed on a moistened soil mixture and sprinkled with a small layer of substrate. Caring for the sprouted seedlings is not difficult: they are watered, weeded, and loosened. If necessary, the grown seedlings are transplanted to a permanent place.

Layering
A distinctive feature of grapevines is their high ability to take root. Moreover, the origins actively develop regardless of the stem’s position in the soil mixture. This property is used to propagate the crop by layering. This is the name given to a rooted shoot that forms its own root system while remaining part of the parent plant. It has been proven that vines that are not separated from the central plant take root much faster and develop more actively. A significant advantage of this method is that layering bears fruit in the same year as the rooting process.
. It is used to expand, replace, or rejuvenate grape plantings. We have prepared simple instructions.
- Prepare furrows in which you will then lay the shoots. They are dug near the vine in the direction of where the bush will grow. The furrow should be 8-10 inches wide and 12-16 inches deep.
- Fill the dug groove with a nutritious substrate. This can be a mixture of soil and humus, both ingredients taken in equal proportions. Or fill the bottom with manure mixed with a small amount of potassium sulfate and superphosphate, and dig up the soil with fertilizer.
- Choose a suitable shoot. It should be fully mature, one and a half times longer than the distance between the mother bush and the young bush allocated to it.
- Carefully remove all leaves from the selected shoot. Leave only three leaves with a developed growth point.
- Place the prepared shoot on top of the groove. Secure it carefully in place with wire clips. Lay the vine carefully to avoid damaging or breaking it. Sprinkle everything with a small layer of substrate.
- Water the groove generously. On average, you need to pour at least two buckets of water.
- After the moisture is completely absorbed, finally fill the furrow with the soil mixture.
During the entire rooting period, the cutting must be watered regularly. This should be done once every week and a half, and more often in hot weather. Once the young plant has developed a complete root system, it is carefully separated from the mother vine.
An important point. Laying the shoot-layering in the ground should only be done in spring during the “weeping” period, when the vine is most flexible and pliable. Grooves for laying can be prepared in autumn or spring.
Cuttings
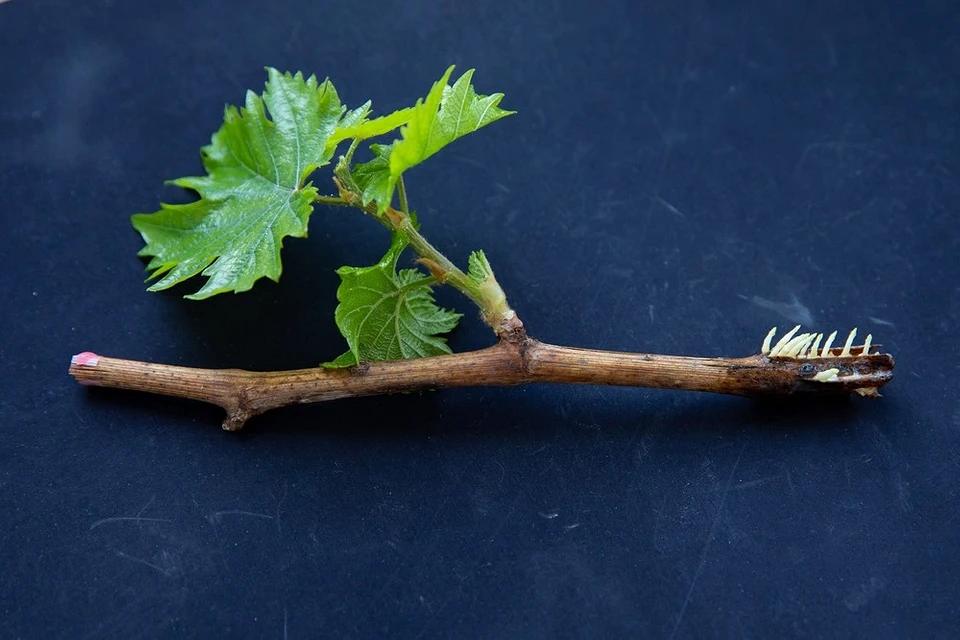
Propagation using cuttings is the most common method for obtaining viable seedlings. There are several variations of the procedure, but the essence remains the same. It consists of cutting a fragment of a shoot from an adult plant, known as a cutting or stem, then germinating and rooting it. Seedlings grown in this way are planted in a permanent place. Important point. The main differences in the procedure are explained by the time of propagation. Thus, cuttings can be harvested in spring, autumn, and even summer. In the latter case, we are talking about “green cuttings.”
Spring and summer planting material can be planted almost immediately, while autumn material must be stored until the following year. To propagate grapes in the fall, you need to prepare cuttings during pruning. They are cut from a mature vine, from its middle part, where the largest number of fruit buds are located. There should be seven to eight such buds on one cutting. The length of the shoot should be at least half a meter. Otherwise, it will dry out over the winter and die. The leaves are removed from the cuttings, the lower edge is cut exactly below the lower bud, and the upper edge is cut at an angle, 0.8-1 inch above the bud. The shoots prepared in this way are tied into bundles and soaked in water for a day.
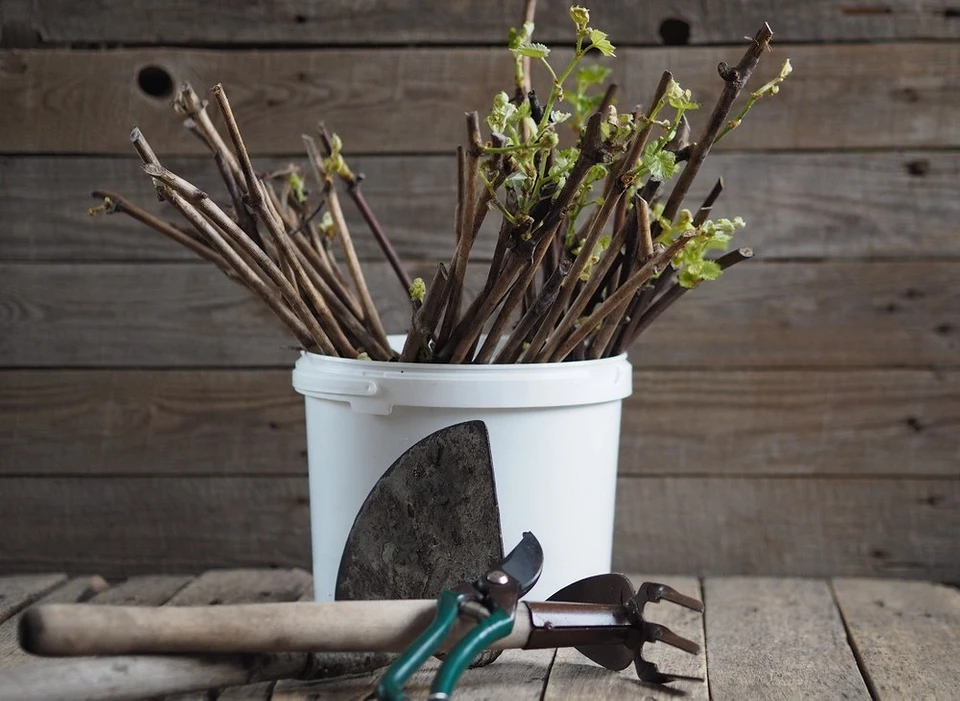
After that, please treat them with a solution of copper sulfate to protect them from fungus. Dry thoroughly, wrap in plastic film, and store. Store the cuttings in a cool place, such as a refrigerator, cellar, or basement. Inspect them about once a month, or more frequently, for signs of fungus or mold damage. For better rooting, the cuttings are pre-germinated. If autumn planting is planned, germination occurs in autumn. For spring planting, germination begins at the end of winter. This is done as follows.
- Take out the cuttings and unpack them. Cut the shoots so that each one has three or four buds.
- Renew the lower cut. Could you do this with a sharp knife or scalpel? The cut should be light in color with small drops of moisture. If it is dry or has black spots, the shoot is dead.
- Prepare the lower part of the cutting for root formation. To do this, use a sharp object to make several grooves to cut through the bark.
- Soak the cuttings in warm water and leave them for two days. Replace the water with fresh water daily.
- Prepare a root formation stimulant solution and place the cuttings in it for a day.
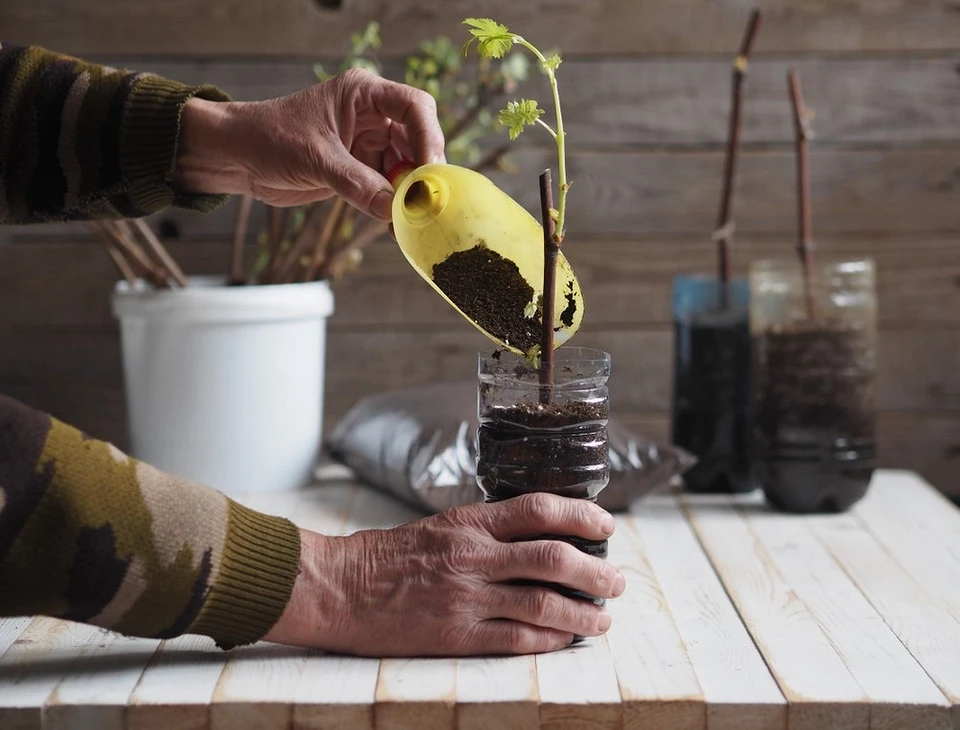
- Prepare containers for germination. These can be pots or cut-off 1.5-liter plastic bottles. Please ensure that drainage holes are made in the bottom of the container. Could you place drainage on the bottom and fill it with substrate?
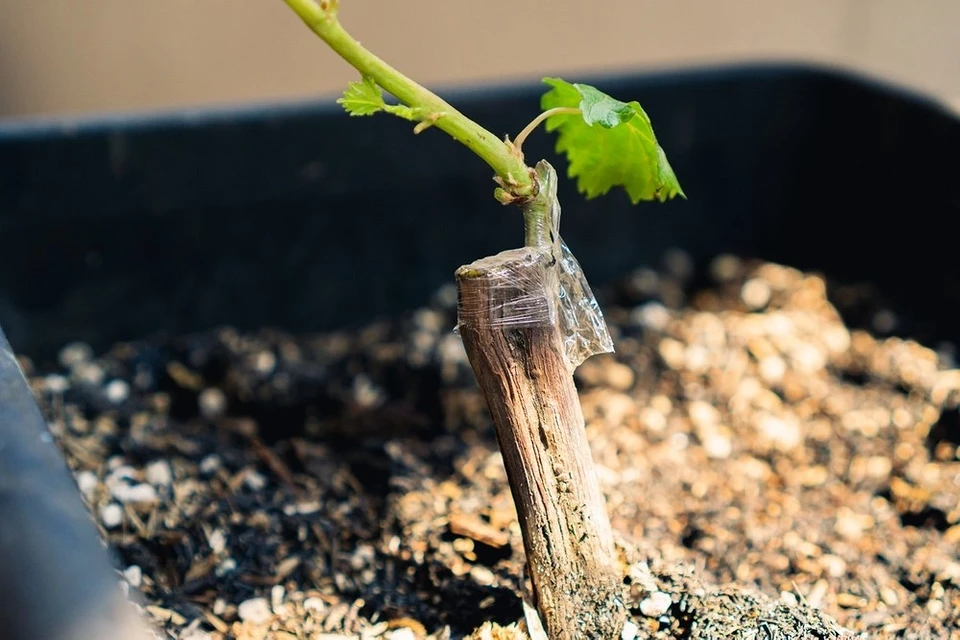
- Moisten the soil in the container and plant the cutting. Cover it with a jar or a cut-off bottle to create a greenhouse effect.
Rooted seedlings should be watered periodically. It is best to do this in a tray. Once young shoots appear, the plant is considered to be rooted. It can then be transplanted to its permanent location.
The method for propagating grapes by cuttings in the spring is almost the same as described above. Only in this case are cuttings taken immediately after winter, when the plant has not yet awakened, and active sap flow has not begun. If you are late and start cutting during the sap flow period, it will be difficult to stop, and the vine may die as a result. Small cuttings are prepared immediately, consisting of three or four buds. They are soaked and germinated. Rooted cuttings are planted in a permanent place.
In summer, another method is used—propagation by green cuttings. In this case, growing green shoots are used for cuttings, rather than woody ones. Let’s take a look at how to propagate grapes in summer. Cuttings are cut from suckers, doubles, and similar shoots. The leaves are removed from them, leaving only half of the upper leaf. Each cutting should have two or three buds. The planting material is soaked for a day, after which it is planted in boxes or small containers. The cuttings are buried 0.8-1.2 inches deep, watered abundantly, and covered with plastic wrap or glass. They are watered regularly, and after rooting, the film is removed. After a month and a half, the seedlings can be transplanted into a permanent location. This is done with frost-resistant varieties, while heat-loving varieties are taken to the basement, where they are stored until spring planting.
Grafting
This is the name given to an agricultural technique whereby part of one plant, known as the scion, is transferred to another, known as the rootstock. After grafting, they exist as a single organism. This method is usually used to replace a variety. Grafting requires some skill and may not be successful for beginners. Most often, a woody cutting is grafted onto a young shoot. Before the procedure, both cuttings are soaked in warm water for two days. If grafting onto a growing shoot, only the scion is soaked.
After that, the rootstock is cut off, leaving 20 mm from the second internode. The cut is split to a depth of 0.8-1 inch. This is done with a sharp knife. The scion is prepared. The lower part of the cutting is sharpened into a wedge shape. Please insert it into the split rootstock so that both elements are in close contact. After that, wrap the graft with film, and if there are any open areas, cover them with garden var.
Important point. All manipulations must be performed quickly so that the sap released from the split and cuts does not have time to dry. Otherwise, it will form a dense film that will interfere with grafting.
❓ Questions and answers

How long does it take for grape cuttings or layers to root?
Typically, rooting takes 4 to 8 weeks under good conditions (moist, warm soil, indirect light). Some methods (like layering) may show root development a bit faster since the branch remains partially attached to the parent plant.
Do I need to use rooting hormone when propagating grapes?
Using a rooting hormone (like IBA or NAA) is not strictly necessary but can increase the success rate, especially for more difficult-to-root varieties. It helps stimulate root growth and reduce failure.
What soil mix should I use for rooting grape cuttings?
Use a well-draining mix: for example, peat moss or coco coir + perlite or coarse sand in equal parts. The mix should hold moisture without becoming too soggy. Good aeration is key to preventing rot.
How do I care for newly rooted grape plants before transplanting them outside?
After rooting, keep plants in partial shade, water moderately (avoid waterlogging), and gradually acclimate (harden off) over 1–2 weeks. Once the danger of frost is past and the soil is warm, transplant into the final location.
Antoine Duval: A winegrower and oenologist with 20 years of experience. An expert in growing grapes for wine and table varieties in any climate.
See also
How to store apples at home in winter: methods and tips for storage
How to plant grapes in autumn: planting instructions and care tips
A place to relax: how to organize a rest area
A tall hedge instead of a fence. How to create and maintain it
Bright hedges: how to combine shrubs with their surroundings


8 Responses
[…] How to propagate grapes at home: 4 methods for every gardener […]
[…] How to propagate grapes at home: 4 methods for every gardener […]
[…] How to propagate grapes at home: 4 methods for every gardener […]
[…] How to propagate grapes at home: 4 methods for every gardener […]
[…] How to propagate grapes at home: 4 methods for every gardener […]
[…] How to propagate grapes at home: 4 methods for every gardener […]
[…] How to propagate grapes at home: 4 methods for every gardener […]
[…] How to propagate grapes at home: 4 methods for every gardener […]